DSG to ZF8 Swap

ZF8 HP55A Transmission Swap Audi C7 S6/S7 –S7: A Complete Guide

This guide provides a detailed and organized overview of how I replaced the factory DL501 transmission with a ZF8HP in my 2013+ Audi C7 S6/S7. As of today the car runs and drives great. The overall experience is much better, and this is now what I consider the best mod I have done to the car.

Introduction

First off, I’ll say this swap has been quite a journey. I learned a lot about things I was previously unfamiliar with and gained a much deeper understanding of my car and how it works. I’m glad I took on this project because it allowed me to do something different with my build while also helping others make this swap feasible.

For anyone that does it after me, it will be simple. This has been a hot topic in the community for a while, many people saying or implying that it could not be done. Not only did I set out to prove it can be done, I am here to prove that anyone can do it and it will not cost a leg or an arm. In fact, it is cheaper than replacing a DSG clutch and way cheaper than replacing a DSG. We will not get too into the WHY, but we will address the HOW.

I will not detail the removal or installation of the transmission itself—thereitself. There are manuals and videos for that. Instead, I’ll cover the hardware, wiring, coding, immobilizer management, and essential tools, along with tips on where to get ODIS and how to adapt everything.

Author’s note: I am not a mechanic.

Hardware Requirements

The hardware part of this swap is fairly straightforward compared to many other transmission swaps. Essentially, you remove S6/S7 parts and replace them with A6/A7 parts.

Everything bolts right up—noup. No custom adapters or tunnel hammering required—makingrequired. This makes it "simple"“simple” compared to other transmission swaps.

Unlike nearly every other ZF8 Swap,swap, we do NOT need to use a standalone TCM such as the Turbolamik ($2500). If you see what some people go through to put ZF8 transmissions in other cars, you would agree we have it easy.

Parts List

    Transmission:ZF8HP55(Part Requirement Transmission ZF8HP55. Any variant from C7/C7.5 or D4/D4.5;5. matchMatch your generation to minimize coding issues. My transmission A6 transmission I selected is NNT code.( It does not matter what code your DSG DL501 was, it will work on any of them)
    them. Rear Differential:Differential A6 (Partrear Numberdifferential, OBC500044D)part number OBC500044D. Rear Axles:Axles Non-sport axles if switching to a non-sport differentialdifferential, (Partpart Numbernumber 8R0501203C)8R0501203C.

    IF you already have a non-sport diff you will keep your diff and rear axles. Shifter Cable:Cable 4G0713265T or 4G1713105D (with assembly)assembly. Transmission Mount Bracket:Bracket 40399115G Transmission Crossmember:Crossmember 40399263G Torque Converter:Converter RS7 or TDI (optionaltorque converter. Optional but highly recommended if you’re using an A6 transmission)transmission. ~ thisThis will turn your A6/A7 transmission into an RS transmissiontransmission.

    SPECIAL NOTE: TRANSCOOLERTRANSCOOLER -

    YOU WILL NEED TO GET A TRANSCOOLER, TRANSCOOLER.

    I USED AN AFTERMARKET COOLER. 

    YOU CANNOT USE YOUR S6/S7 TRANSMISSION COOLERCOOLER. THE BRACKET WILL NOT MOUNT UP. 

    YOU CAN GET A6/A7 TRANSMISSION COOLER AND LINES.

    Additional Hardware Notes
    -

    You must swap and add a few bellhousing bolts:
    -

      1 × M10 100 mm bolt on the bottom where there is an extra hole.
      - 2 × M10 60 mm bolts to replace where your original bolts are too short.

      Bellhousing Bolt Locations

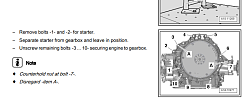
      Take a look at this picture of DSG VS ZF8 bellhousing bolt locations for referencereference.

      ZF8

      ZF8:
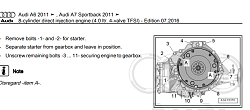
      image.pngZF8 bellhousing bolt locations

      DSG

      DSG:
      image.pngDSG bellhousing bolt locations


      Tools Required

      • Strong Battery Charger/MaintainerMaintainer. (Always keep this connected while reading/flashing)flashing.
      • ODIS EngineeringEngineering, (ODIS-E)E.
      and ODIS ServiceService, (ODIS-S),S, with GEKO account or dealer/shop accessaccess. VCDSVCDS, (VAG-COM)COM, for user-friendly coding and diagnosticsdiagnostics. ODIS Compatible Flash CableCable, (for example,example:
        VNCI 6154A or Mongoose JLR Pro/Clone)Clone (Tactrix Openport will not work) VAG style wire depinning tooltool. (canCan be found on Amazon)Amazon. DS1 ~DS1, though it can be done without, it is more complicated without itDS1.

        Cable warning: Tactrix Openport will not work.

        Wiring Adjustments

        You must repin the DL501 transmission connector to match the ZF8HP layout. Correct pin assignment ensures the TCU can communicate properly with the transmission.

        Pinout for 2013 Audi S6 Using A6/A7 Transmission Code NNT

        Pin / Color

        PINPin COLORColor
        1 Blue Black 2

        Blue/Grey

        5

        Orange/Black

        6

        Orange/Grey

        8

        Green/Purple

        9

        Black/Purple

        11

        Grey/White

        13 Red/Grey 14 Brown 15 Green/Yellow

          Unused Wires:

          Wires
          • Brown/Grey
          • Red
          • Green

          Note: Wire colors may vary by model year or region. Double-check your wiring diagram or verify continuity to confirm where each wire goes. Comment below if you need help.

          Helpful Resource

           YouTube Video:
          https://www.youtube.com/watch?v=GRNb2nNMf0M
          ( Transmission Connector Repinning Process

          This explains the transmission connector repinning process in detail.)

          Immobilizer Management

          These cars run on Immo V/BCM2, so you must ensure your new transmission TCU and the ECU/cluster are aligned.

          If your powerclass does not match, or if you have physically changed control modulesmodules, (such as the transmission),transmission, you will need to adapt or disable the immobilizer:immobilizer.

          1. Adaptation with ODIS Service
          -

            Use ODIS-S with a valid GEKO account to adapt the TCU, immobilizer, and cluster if necessary.

            2. Alternative Solutions
            -

              An emulator, such as those from abitres or a VAG-TCU Immobilizer Emulator(physical),Emulator, physical, can bypass the immobilizer.
              - Some tuners or services can do Immo-Off or IMMO TRANSFER using your DL501 EEPROM data on the AL551, although those appear less common. ODIS adaptation is generally easiest to get ahold of for the average joe.

              Why Powerclass Matters

              Powerclass is part of the immobilizer handshake.

              If the ecuECU powerclass and the powerclass the immo is looking for do not match, you will trip the ECU immobilizer.

              For example, flashing RS7 software onto an S6 ECU sets powerclass to RS7. Unless you manually match it to the S6 BCM, you will have an immobilizer conflict.

              If you are using my modified file, powerclass is already matched to C7 CEUC engine which is what the immo handshake is looking for.

              Swap Process

              1. ECU Flash
              -

                Contact DS1 and provide your DS1 serial number, explaining that you will not change your ECU hardware but need an RS7 bin.
                - DS1 will supply a stock RS7 filefile, (e.g.,for example 4G0906560B__0008 for a C7 RS7).
                -RS7. Full Flash the stock RS7 file,file. then calCal flash the modified RS7 bin from the attached folder. This modified file already has powerclass and IMMO settings adjusted but is otherwise stock.
                - Before driving, copy over any needed (MAP SENSORS. SOI, FUEL IGNITION TABLES) tables from your old S6/S7 tune using TunerPro.TunerPro:
                  MAP SENSORS SOI FUEL IGNITION TABLES Open two instances of TunerPro since the XDFs differ between files.
                  - Refer to other sectionssections, (e.g.,for VCDS)example VCDS, to confirm coding and clear any codes.

                  2. Repin the Transmission Connector

                    Repin the transmission connectorconnector. (seeSee Wiring Adjustments)Adjustments. then plugPlug it into the transmission
                    -transmission. Flash the TCU with an RS6/RS7 .frf file. If you have the RSRS, (RS6/RS7)RS7, transmission, skip this step.
                    - For details on obtaining ODIS-E, see the Where to Get ODIS”ODIS section.

                    How Toto Flash Transmission with ODIS ODIS-E Video

                    Refer to the associated video for the ODIS-E transmission flashing process.

                    3. Adapt the Immobilizer with ODIS-S
                    -

                      See Immobilizer Management”Management (above)above for details on matching the TCU and ECU with your cluster/BCM2.
                      - If you lack a local shop or dealership, refer to Where to Get ODIS”ODIS for info on buying ODIS-S plus a server login.
                      - Complete the online GEKO procedures to link the new TCU and ensure no immobilizer conflicts remain.
                      - Make sure you have all of your vehicle's programmed keys with you for the Immobilizer adaptation process.

                      IF YOU ARE USING RS TRANSMISSION 

                      YOU ONLY NEED TO DO ECU FLASH AND ADAPT THE IMMOBILIZER IMMOBILIZER.

                      THEN PROCEED TO THE VCDS SECTION.
                      - Make sure you have all of your vehicles programmed keys with you for the Immobilizer adaptation process.


                      How to Locate Immobilizer Adaptation and SVM in OdisODIS Service Video


                      Refer to the associated video for locating Immobilizer Adaptation and SVM in ODIS Service.

                      4. Scan with VCDS and Apply Correct Long Coding
                      -

                        Once you have flashed and adapted components, perform an Auto-ScanScan. (seeSee the upcoming VCDS Section)Section. and addressAddress any faults.
                        - Paste correct long coding if a module appears uninitialized. An uninitialized (Themodule longwill codingshow all zeros for thecoding. module is showing all 0's). When prompted, click Yes to use default values.
                        - Clear remaining fault codescodes. and confirmConfirm everything is coded properly.

                        5. Start and Warm Up
                        -

                          After major faults are cleared, start the car and let it warm to operating temperature.
                          - Check and correct transmission fluid levels. Refer to hardware or standard ZF8 service guides for fluid procedures.
                          - Perform transmission adaptations (via VCDS or ODIS)ODIS for the best shifting results.

                          6. TCU Tune
                          -

                          After confirming the car drives well, choose a tcuTCU tuner and flash a tcuTCU tune that suits your modded vehiclesvehicle's power levels.

                          VCDS Section

                          You will use VCDSVCDS, (VAG-COM)COM, throughout the swap to verify functions, read/clear fault codes, and confirm final coding:coding.

                          -

                          Basic VCDS Process

                            Perform an Auto-Scan to detect modules and fault codes. Click "Autoscan"
                            -Autoscan. Click the "Gateway Installation List"List to confirm which modules are present.
                            - Double click on any red or problem modules to open and review them.

                            *****

                            Uninitialized Module Message

                            If, after flashing the ECU or TCU, VCDS indicates a module is uninitializeduninitialized, (all zeros showing for coding),coding, you must re-insert or paste the proper coding:coding.

                            -

                            • For ECU/TCU/ABS coding, you can try using my provided long coding if you have a C7 with air suspension and sport diff removed.
                            • Adjust if needed.
                              --
                            • For non-ECU/TCU/ABS modules, use your original coding from a previous Auto-Scan.

                            Long Coding

                            Below is what worked for my C7 Audi S6S6, (with air suspension and no sport diff).diff.

                            If you see errors like Module Incorrectly Coded,”Coded, you may need to tweak thesethese. (commentComment below for help):help.

                            Engine Coding: 1A2A003265460A0E1000
                            Auto Transmission Coding: 000001
                            ABS Coding: 65A64F01A665F2805B00

                            For the

                            ABS module you must click Security accessAccess

                            then
                            waitClick Security Access. Wait for the bubble to pop upup. and enterEnter the alternative coding passwordpassword. mineMine waswas:
                            S11820
                            then
                            you can goGo to codingcoding. and pastePaste the codingcoding. and itIt should accept.

                            Special Note:Note

                            Currently, my engine module shows the following code, which does not affect operation:

                            4715 - No Communication with Instrument Cluster
                            U0155 00 [00100111] - -
                            [Lost Communication With Instrument Panel Cluster (IPC) Control Module]
                            Not Confirmed - Tested Since Memory Clear

                            I plan to resolve this using SVM in ODIS-S on the Instrument and Engine modules.

                            If that does not work, the code can be masked or disabled in the tune. It has not caused any issues or effects on driving. The instrument cluster also communicates and operates fine.


                            Let me clarify : clarify:

                            If you follow this swap process correctly you will have NO swap-related error codes on the dash at all. all.

                            If you do see any codes other than this one iI mentionedmentioned, then comment below for help. 

                            This will be a clean, proper swap.

                            Deleting the Sport Diff

                            If your original car was equipped with the sport diff but you have now installed a non-sport rear diff, you’ll need to delete the sport diff in VCDS:VCDS.

                            Sport diffDiff delete:Delete


                            1.

                            1. With no errorserrors, (sometimes errors workwork, just depends on your VCDS)VCDS, go intointo: instruments
                              • Instruments module
                              -Coding codingUncheck -Sport uncheckDifferential sportInstalled differential installed

                              2.

                              Turn off car,car. turnTurn back on and verify no dash errors. If soso, continue.

                              3.

                              Go intointo: canbus
                                CANBUS module - gatewayGateway list -Remove removeAWD AWD.

                                4.

                                Restart car,car. ifIf no dash errorserrors, continue.

                                5.

                                Go into the rear of the car and remove the Fusefuse for ONLY the sport diffdiff. (carsCars might vary in fuse location, check diagrams).diagrams. Verify no errors on dash. If soso, youryou’re good to remove the diff wiring/andwiring and/or diff.

                                6. DO NOT REMOVE THE AWD MODULE OR UNPLUG IT.

                                Additional Information

                                 Sport Differential Delete Video

                                Enabling Paddle Shifters / Tiptronic

                                1. Enable Shift by Wire
                                -

                                In VCDS,VCDS:

                                go
                                  Go to Select Control Module,Module. thenGo to ACC/Auth,Auth. thenGo Coding,to thenCoding. Go to Long Coding Helper.
                                  -Helper
                                  . Find Shift by Wire. and checkCheck it.
                                  - Close the Long Coding Helper. Click Do It to confirm.

                                  2. Activate Steering Wheel Tiptronic
                                  -

                                  In VCDS,VCDS:

                                  go
                                    Go to Transmission,Transmission. thenGo Adaptation.
                                    -to Adaptation. Look for the channel Steering Wheel Tiptronic. and setSet it to Active.
                                    -Active. Repeat for any other features, such as gear display, that you want active.

                                    Make sure all three connectors on your gear selector assembly are plugged in. 

                                    If you only have two connected, you are missing one.

                                    Where to Get ODIS

                                    ODIS-E

                                    ODIS-E, Engineering, is used for flashing.

                                    -

                                    • ODIS-E (Engineering) can be purchased cheaply from sites like OBDII365OBDII365.
                                    (FOR FLASHING)
                                    -

                                    ODIS-S

                                    (Service):

                                    ODIS-S, (FORService, SVM/IMMOBILIZERis ADAPTATION)
                                    -used Youfor canSVM askand Immobilizer Adaptation.

                                    Options include:

                                      Ask a local VW/Audi dealership orto do the required adaptations. Ask a specialized VAG shop that has a GEKO accountaccount. to do the required adaptations for you
                                      - You can also purchasePurchase the software and one-time logins from various sellers on aliexpress.AliExpress. Some willsellers charge around $40 dollars for ODIS-S installation plus $40-$60 dollars for a one-time server login.
                                      - There is also anotherAnother popular website foris thisVW-GEKO. https://www.vw-geko.com/
                                      -

                                      Be sure to confirm that Audi is active (for immobilizer and component protection services)services before paying for any logins or scheduling adaptations.

                                      You can check the status here or on their WhatsApp https://status.vw-geko.com/WhatsApp:

                                       VW-GEKO Status

                                      Use these services at your own risk. 

                                      In SOME cases, someone will remote into your computer to do the login. 

                                      If you are purchasing from AliExpress you do have the ability to dispute if there is an issue. 

                                      Make sure that you inquire and confirm immobilizer adaptation is active/available before purchasing.


                                      TRANSMISSION

                                      Transmission TUNINGTuning

                                      -

                                      • I opted to tune my transmission using HPTuners,HP Tuners, which offers a user-friendly solution for ZF8 transmissions.
                                      (This is only if you know wtf you're doing or know someone that does)
                                      -does. You could also choose from one of the well-known ZF8 TCU tunerstuners, (e.g.,for JHM,example: ETSpec)
                                      toJHM getETSpec a TCU tune.
                                      - Ultimately, if your car is highly modified, you will need a TCU tune. The stock TCU expects certain RPM and torque limits, so exceeding them can trigger transmission codes or a Transmission Malfunction”Malfunction warning. This doesn’t harm anything;anything, but it will make you shit bricks if you didntdidn’t know that it just means you needneed: a
                                        A TCU tune that accommodates higher rev limits and torque levelslevels. orOr to adjust your ecuECU tune accordingly. If you happen to be running below stock RS6/RS7 power levels and using stock rev limitlimit, you technically dontdon’t need a transmission tune yet.

                                        C7.5 Warning

                                        IF YOU HAVE A C7.5 YOU CANNOT USE MY FILES


                                        YOU WILL NEED TO SOURCE A TCU FILE THAT MATCHES THE GENERATION OF YOUR TRANSMISSION AND AN ECU FILE THAT IS C7.5 RS7 AND RS7.

                                        MODIFY THE POWERCLASS TO C7.5 S6/S7 ACCORDINGLY.

                                        File Overview:Overview

                                        ECU File

                                        MED17_1_1_ C7 RS7 STOCK 0008 IMMOFFPC41.bin
                                        -

                                        FLASH THIS TO YOUR ECU (ECU.

                                        CAL FLASH WITH DS1)DS1.

                                        TCU File

                                        FL_4G0927158BD_1007.frf
                                        -

                                        FLASH THIS TO YOUR TCU USING ODIS-E AND YOUR ODIS COMPATIBLE CABLE (CABLE.

                                        ONLY IF YOU ARE USING A6/A7 TRANSMISSION) TRANSMISSION.

                                        THIS IS A C7 RS6 STOCK FILEFILE.

                                        Plaintext Guide

                                        ZF8SWAP.TXT
                                        -

                                        THIS GUIDE IN PLAINTEXT FORMAT FORMAT.

                                        READ IT IF YOU GET LOSTLOST.

                                        Costs

                                        Below is what I spent while trying to keep this swap budget-friendly. Your total may differ based on availability, upgrades, or professional assistance:assistance.

                                        Item Cost
                                        ZF8HP55 TransmissionTransmission, (NNT Code)Code $400
                                        Torque ConverterConverter, (RS7 or TDI)TDI $300
                                        A6 Shift Assembly $70
                                        A6 Transmission Mount $60
                                        A6 Cross Brace $100
                                        A6 Rear Differential $160
                                        A6 Rear Axles $100
                                        Miscellaneous ( Miscellaneous, Tools/Fluids)Fluids 1000$1,000

                                        Total $21902,190


                                        Disclaimer

                                        The costs and methods listed here reflect my personal experience completing this swap. Your expenses and approach may vary.

                                        This guide is for informational purposes only, and you should follow all relevant safety precautions, consult with professionals where needed, and verify the compatibility of parts before undertaking any modifications.

                                        I am not responsible for any issues that may arise from performing this swap.

                                        Dynospectrum does not endorse or support this transmission swap in any capacity. Please do not contact them for assistance with the swap.

                                        They specialize in ECU flashing software, not transmission or engine swap support. That said, they were extremely helpful with the ECU side of this project.

                                        As always, everything you do to your car is at your own risk.


                                        Credits

                                        This project would not have been possible without the assistance and insights from the following individuals and resources:

                                        -

                                        • QCrazy
                                          -
                                        • Audiquattro44
                                          -
                                        • PRJ
                                          -
                                        • Dynospectrum
                                          -
                                        • Christian O
                                          -
                                        • 813garage
                                          -
                                        • FE Performance
                                          -
                                        • Artemesia
                                          -
                                        • Projectlsaudia4
                                          -
                                        • Sleepertuned
                                          -
                                        • MWELL
                                          -
                                        • TGK Motorsports
                                          -
                                        • Shane Horning
                                          -
                                        • AudiNeil

                                        Thank you to every one who helped in any way big or small.

                                        With the right tools, patience, and know-how, a ZF8 swap can transform an Audi C7 S6/S7 into a much more reliable and durable animal.

                                        IFIf you appreciated this swap guideguide, follow me on instagramInstagram: @stolens6